
Cosplay Make Up...

Nanao Ise from Bleach
Hi there! In my previous post I said I went to a Sakura Matsuri. Zenkaikon was hosting a cosplay fashion show, and I just couldn't resist. Cosplay amongst the gorgeous sakura? Sign me UP. The kareshi & I decided to do a pairing cosplay of 8th Division Captain Kyouraku Shunsui & Lieutenant Nanao-chan from Bleach. I already had the standard Shinigami (Soul Reaper, if you watch the dub) uniform since I cosplayed as Rukia so that was taken care of. Same goes for the waraji (straw sandals...kareshi made them...will have to blog about that amazing feat!) and tabi (socks with split toe). My wig was purchased from a local wig store for $20 and I styled it myself into her signature French twist style. With lots of bobby pins. And lotsa Got2B Freeze Spray and Spiking Glue...every cosplayer should have these for wigs...it's a must! Nanao's lieutenant badge was home made by my father. I drew on the character and symbol. He used a bleach piece of wood and sanded it down into the desired shape. I then took an old white pillow case and cut it up to use two strips from it for the band. I used heavy duty wood tacks and hammered the fabric into the wood. I bought Nanao's signature silver glasses from the accessory store Icing. They were $14. Moving on...
Before I do a cosplay, I review the character's pictures and decide what kind of make up would be best. The make up brings out the character's essence in my opinion. Is your character cutesy, sexy, or mysterious? Do they look like they are wearing some make up or have some type of special feature like a beauty mark you need to add or freckles? Perhaps your character has purple hair. So, they probably have purple eyebrows. It adds to the cosplay, and the con paparazzi see that.
Nanao, from the pictures and anime, has a distinct cat eye. Actually, a lot of the Shinigami women do. They have that come hither, deadly look when you first come upon them. However, if you watch the show, you know most of them are crazier than a box of frogs and fun. So, I approached Nanao with this in mind. She has the sexy librarian look is what I concluded.
Here is how I did my make up, step by step, in photos. This look, you may find, can be used for other characters, so please feel free to use it! I think it can even be used if you are going to a club...hey, cosplay everyday, right?!? ^___^

This is me. No make up. No contacts. Nuttin'. Before you begin, I recommend wearing either a bathrobe, button up shirt, zip up jacket/hoodie, or whatever you are wearing under your cosplay that won't get make up on it (like a cami or tank top).
Most importantly, take care of your cosplay face! You are going to have make up on alllll day (maybe all night, if you are one those people I see wandering the halls at 3am lol) and you do not want to break out. And please, do not sleep with your make up on. I know, it is so tempting when you go home or back to your hotel room to just fall on the bed and sleep because of the energy sapping cons we go to, but don't. Take the two minutes and wipe off your face with a make up cleansing wipe. You can get them at drugstores for a good price. I use MAC face wipes. They smell so nice and work like woah on the heavy cosplay make up. Neutrogena makes really nice make up removing wipes too.
Ok, now let's get down to business. I cleansed my face with a mild cleanser from Lush. I then used an under eye cucumber cream and a face lotion from Lush. You do not have to use an eye cream, but I recommend it especially in the morning when your eyes may be puffy. It calms it. The face lotion is always a grand idea since it acts as a barrier between your foundation and your bare skin; it keeps the skin nice and moisturized and lesser chance of a break out. I then put chapstick on to get my lips hydrated for lip stick or gloss at the end of the make up process.


OK, contacts in. You can tell a bit in this pic that my brown eyes are obviously a different color, but not so much yet. My apologies on not taking a better one :(


This right here is another extra step I learned several months ago, and became hooked. I was at Macy's buying concealer from the Bobbi Brown counter and the make up artist taught me about corrector. My God. I wish I had known about it before. As you can see from the before and after pictures, it pretty much covers up any dark circles you have. I use a small foundation brush or my finger and pat it on gently right on those dark circles. GONE.

On to concealer. Love me some of that Bobbi Brown concealer. One of the heavy hitters out there. First pic, I gently tap my foundation brush (I know it is not a concealer brush, I like using this smaller foundation brush. Whatever works for you. Sometimes I will use my finger.) in the concealer and go over my under eye area. Concealer does what it says: conceals dark circles or discoloration. The middle pic is me using a small brush to swipe on the special under eye powder to set the concealer. This comes with the Bobbi Brown concealer. Bottom pic is the finished eye area. Nice and bright and fresh!

Foundation is next. I am using Bobbi Brown's Long-Wear Even Finish Foundation. It comes with a small sponge to help smooth it on. It glides on like a dream and makes your skin feel silky smooth and look flawless. I really recommend on using foundation for cosplay because it gives your skin the perfect finish and is the icing on the cake after concealer. Perfect for pictures, right? The bottom picture is a finishing powder from Smashbox that I brush over the foundation.

Onto eyes! First I put on Urban Decay's Eye Shadow Primer Potion in sheer nude. This keeps eye shadow and liner right where it should be: on your eyes. Ha ha ha. Lightly tap the primer over your whole lid and up to your brow bone (right underneath your eyebrows). Since I am doing a cat eye, I extended the primer a little further out. The palette I am using is from Two Face Cosmetics. Find a vanilla colored eyeshadow and load your brush. Sweep it over your lip and up to the brow bone. This is the base color.

I wanted Nanao to have a bit of silver on her eyes for an accent of color to bring out the violet eyes. I used it only on my eyelid.

I was doing a slight smoky eye...Shingami smoky eye for the mysterious, sexy librarian look that Nanao-chan has about her. I used an angled brush and loaded it with a black eye shadow with a hint of sparkle in it. I started from the outside corner of my eye and swept it in, blending it into the silver. I did not go beyond the middle of the eye. Then, I moved it upwards just a tad above my eye crease, as you can see in the picture. The two colors will become fused.

This is gel eyeliner from MAC. This seemingly easy looking product is something you get good at using with practice. Some people can do winged eye liner or cat eye very easily. Don't give up. Keep practicing. Trust me! It's sooo worth it in the end.

These three pics show the cat eye process. First pic: I dip the special eyeliner brush into the gel and do a practice stroke on the back of my hand. I then slightly look down and draw on a line coming down almost diagonally from the end of my eyebrow. I use that as my guide. After that, I line the top of my eye along my eyelashes. Start off with a thick line that tapers off before it hits the corner of your eye. Go back to the wing of the where you began and go over it again until you achieve the desired shape and thickness of the liner. Second pic I am cleaning up the area of the wing to make it sharp by using a make up wipe. Doing that has helped me master the cat eye/winged eye liner look. End result on the right! SUCCESS!


As you can see, I filled in my eyebrows. I use an eyebrow pencil from Anastasia Beverly Hills that can be purchased at Sephora. I like to fill in my eyebrows as it shows up well in photos. If you do not have a pencil, an eye shadow that matches your eye brow color will suffice. The character I am cosplaying has black hair. Does that mean she needs black eyebrows? No. Not unless you want her to. I tried it once and it was too severe. It looked bad. On the other hand, if your character has purple or blue hair, then their eyebrows would be that color. I will touch on that on a future post, no worries! Again, you can see in the bottom pic I used the highlighter again. I used it along my brow bone as it makes your eyebrow arch look well defined and nice all around!

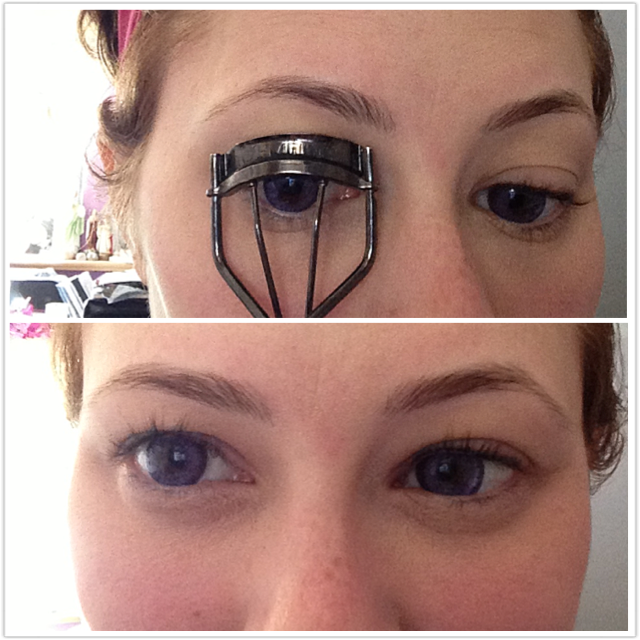
Here's an up close and personal...of mascara. Use waterproof for cosplay. You know how it is at cons...can be crowded and hot. Also, what if you run into your favorite JPOP singer and cry? Or get caught in the rain. Use it; 'nuff said. Take the wand and wiggle it up while brushing it on your eyelashes. It will separate and curl them. Remember the eyelash curler from earlier...no false lashes here. I have used them on past cosplays though, when it called for it ~__^

Lipstick and lip liner...I love using lip stains for cons. You don't have to worry about re applying throughout the day. Maybe once, if that. I trace the outside of my lips with a lip liner that matches the color of my natural lips. This keeps the lipstick, gloss, or lip stain in place. It also makes your lips look fuller. If you have a highlighter stick or white eyeshadow (like the kind used on the cheekbones and brow bone) use it on your cupid's bow. That is the dip in the middle of your top lip. This also makes the lips look nice and full!

The end. Finishing spray. I swear by this product. It has never failed me! Spray it lightly over your finished made up face and let air dry. The make up will NOT move until you take it off! It is awesome!
Welp, we have come to the end of this first make up tutorial. I hope you liked it and learned something to use in a future cosplay. Make up, like I said, can really make the character. I must add that you do not have to use the same products I used. If you are happy with the make up products you have been using and you are happy with them, then stick with it! I have my favorites, which I have and will be sharing with you. Maybe you will want to use one of them and see how it works for you! Alright, here's some piccies of me cosplaying as Nanao-chan at the Sakura Matsuri. Until next time, minna-san!

Captain Kyouraku & Nanao-chan


Nanao took off her glasses ^_^ You can kinda see my hair. It popped outta the wig cap at the end of the day and I didn't realize. Oh well!
EDIT: 5/1/13: I am so sorry. I skipped over one step. After gel liner, I lined my lower eyelid with black eyeliner. I used a kohl liner from Bobbi Brown Cosmetics. Try to find a liner that is waterproof or has a guarantee of not running or smudging. You don't want raccoon eyes in your lovely pictures! *~*^_^*~*
EDIT: 5/1/13: I am so sorry. I skipped over one step. After gel liner, I lined my lower eyelid with black eyeliner. I used a kohl liner from Bobbi Brown Cosmetics. Try to find a liner that is waterproof or has a guarantee of not running or smudging. You don't want raccoon eyes in your lovely pictures! *~*^_^*~*
No comments:
Post a Comment